And, who better to give them some great advice than the very one who threw all of these misfits together in one room so very long ago! ...Yes, that's right, these rooms belong to me! I have never revealed this front room of our house on the blog because I have been meaning to "get to it" for like 6 straight years! It has housed the furniture we brought for our old houses waiting for some attention while the other rooms were priority. And if you come to my door this is why I always stand on your right side and talk you straight to the back of the house!
No more excuses. After thinking about it many many times I have some plans in the works. After all, it is the first impression of our house and you never get a second chance to make a first impression, right?!
THE BEFORE... or I suppose I should say, "Right Now"
View from dining room looking into front room. (imagine front door and foyer to your right)

Below: front room, view coming in from main door....I know what you are thinking but this is not a dance floor... Although, there is a "kids" TV behind that black armoire and this sprawling open area has been know to be host to some Wii dance offs. Also, a tumbleweed crossing for Newman's hair poofs!

 Up until a week ago there was a large rectangular leather ottoman that used to sit in front of the couch... SOLD, thank you Craig(slist). And now the couch above is also for sale on Craigslist. The armoire is one of the first pieces of furniture my husband and I purchased and I still love it even if it doesn't find a place in this house, we will store it until we can use it again.
So What's The Plan?!?!


So What's The Plan?!?!
My master plan for the room(s) is based around the art deco chairs my mom gave to us. I showed them to you a few months ago but just to remind you... They are black lacquered chairs...yes!! I have always loved the look of these chairs. I need to find new fabric to recover them in and a table as I am not using the glass rectangular one pictured here (too hazardous with the 6 small hands that I would have to degrease off it every night!)

Rather I have come across these possible table options...


via: Pinterest

Via: Pinterest
I am loving the ideas of having a big over sized round table. I love the teak looking wood in contrast to the shiny black lacquered chairs. I also love the one above with the white lacquered pedestal!! Decisions decisions...For the walls in both rooms I am planning to paint everything white! But not just white, white lacquered painted walls! You may recall my post last month when I was obsessing over all white walls.
See below, just to give you an idea of the sheen check out this dining room with lacquered walls... glam o rama!!
 Via: Pinterest
Via: Pinterest
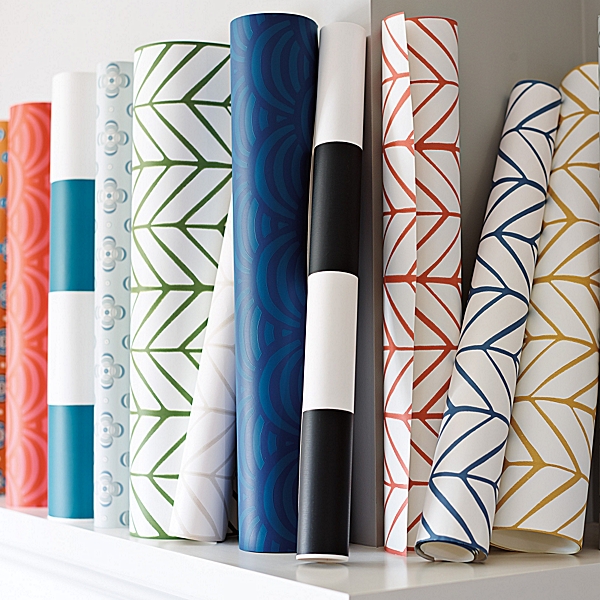
I also found this paper below over the weekend and am thinking this would also look very cool on the ceiling if the black doesn't fare well with the hubster!
sorry phone photo, but you get the picture (no pun intended)?! Stunner....
 For the largest wall in the dining room I have a design in the works using trim. Lots of trim! I am really excited about this! It is one of the reasons I am using all white as I love allowing good trim work to stand on its own in white. It is very detailed so any color would draw away attention to the woodwork itself! GONNA MAKE YOU WAIT FOR THIS ONE!! hehehee
This also means that I may need to use this dining room buffet I bought at a thrift store in the front room instead of against my secret feature wall in the dining room. Here is a photo of it as it stands. I also plan to revamp this piece. Are you seeing the time commitment ahead of me because I certainly am!


 My inspiration for this buffet makeover might have come to me this weekend in the form of a vintage bracelet my daughter Stella received in a a bag of "costume" jewels originally worn by her great great grandma. I love these colors striped together like this. Thinking I may be able to replicate this look somewhere in the refinishing of this buffet. Um, I think. Haven't figured that part out yet!

So in the front room I want to use the green velvet Ikea sofa that came out this year! Love the color, love the price and what better place to take a risk on a colorful sofa than in a sitting room you are not using every day.
 And I am loving some of these pillow patterns as options for the couch

This also means that I may need to use this dining room buffet I bought at a thrift store in the front room instead of against my secret feature wall in the dining room. Here is a photo of it as it stands. I also plan to revamp this piece. Are you seeing the time commitment ahead of me because I certainly am!


lots of good storage in this bad boy...


So in the front room I want to use the green velvet Ikea sofa that came out this year! Love the color, love the price and what better place to take a risk on a colorful sofa than in a sitting room you are not using every day.

Via: Ikea


Via: Pinterest
These graphic pillows below are exceptional! Don't you think!?!

Via: Pinterest
I am also obsessed with these black and white chairs I found! I would love to be able to replicate this look on a reupholster job! Maybe even on two matching cain back armless chairs. Love love love!!!
Via: Pinterest
Even though I still love my teal drapes (see before and now pics above) in the rooms I think I am going to need to find another home for them. I love the idea of doing either simple black and white drapes or use a punch of color and do solid yellow panels like these below! What do you think?!?

Via: Pinterest


Via: Pinterest and Uptown Modern
So in my experimentation with some collage sites I have put together a little preview with the colors & style I want to convey in the room. Obviously, not exact picks but it still gives you an idea, yes?! Like I said, I am experimenting in hopes of getting better with these! No really... you would be AMAZED at how computer illiterate I am. 
Also coming down the line is my client dining room reveal we are wrapping up in the next couple weeks! And Tuesday I met with a girl to revamp her bedroom. She is a Interior Therapy nut like I am so I think we are kindred spirits! If you are not watching this show on Bravo you are missing out! Hands down, funniest interior design reality show I have ever seen! Thank you Kelly Rees for making me a addict!
Here they are:)