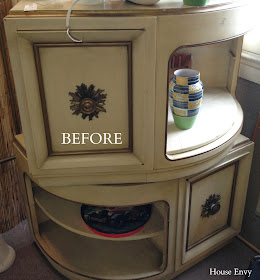
The plan was to make them a part of my new front room plan! You may be sick of hearing about this project but I'm bringing it to you step by step as you oftentimes see the "before" and "after" of these room transformations and it seems like the magic wand was used and all the sudden they go from zero to awesome with what seems like little effort! Not not true! It's always a process but having a design plan really does work and keeps you on task without wanting to jump ship part way through! Here is the detail on the buffet I redid a couple months back for this same room and so it inspired the look for these new tables as well!
I (or should I say, we) started by patching any scrapes or dents, sanding and vacuuming clean the dust before applying the "Kilz" brand primer.
I use "Kilz" OIL based primer as we will use a black oil based paint to get the extra shine an oil base can provide mimicking a lacquered look! Here it is with the primer applied. I left the original gold paint on where it was as I originally planned to keep the gold and touch it up. In the later pictures you will see I changed my mind (it happens...a lot)!
And because every antique piece has a story it is always fun to uncover it!! Remember how I found old typed out sewing instructions for everything from outerwear to undies in my mid century sewing desk I turned into a homework desk? Well on this one I found the freight slip from Chicago dating these tables back to 1957 and valuing them at $274 back in the day! I paid $50 for each table!
After I applied the Kilz oil based primer I applied 2 coats of the black oil based paint. I decided to try my luck on lacquer top coat rather than polyurethane which is what I would normally use. The guy did warn me that while I may get a tiny bit more shine from lacquer, it is harder to work with as it withstands no temperature changes and also overtime can flex and crack on things like chairs. Since I was applying inside the house and on a table, I thought no big deal. But during the height of my hallucinations (honestly, the MOST toxic stuff you can stick your face near) I decided to crack the window and the finish started to CRACK all over! WTF, and yes I yelled that in it's full form. Therefore, poly coating wins and the word lacquer is nearly blasphemy in my home.
So after sanding it down, luckily I had not applied the lacquer to the whole piece, I repainted a top coat of the oil based black and finished with polyurethane in a gloss finish! I also used "Rub n Buff" in "Grecian Gold" to shine up the beautiful hardware, cause after all, that is what these tables are all about anyway!
Here is the result!!
Because these are 50's style tables I had to add these antique "Lenox" old school lighter and cigarette holder to the display! I set out into an antique place looking for anything that would have reminded me of my glamo-rama grandma Garton who would could have very well sat around with great company in a room like this having nothing other than great conversion and lots of laughs.
Left to do on the room?! I need to get a white rug to anchor the sofa with the two chairs I need to refinish. I'm considering a white cable knit rug like this one!
Here are the chairs! they will go side by side facing the green couch with a small round table between them. They will both be sprayed black and then I need to find a black and white fabric for them. 

I also would like to incorporate some hot pink in a throw or in a pillow or two on the chairs or couch. When I photographed the tables I loved the hot pink color of my flowers with the yellow, green, black and gold.
On another note...I sent off my dining room chairs to be recovered in this fabric and the big round dining table should be here any day!!
Dining chair fabric:
Dining chairs to being recovered:
Can't wait to see it all together. Stay tuned! Is it starting to look like the plan?! I hope so!
Cheers!! {Laura}


oh my goodness! that table is so funky and awesome!
ReplyDeleteThanks Cassie:)!
DeleteThis is so good! I love the end tables and how they turned out and I hope the hardware is screwed on tight because someone might just remove them while visiting your home ;)
ReplyDeleteHaha!! yes, creepers! I will watch for them and bolt them on tight:)
DeleteThe tables look fantastic! I hate when you have product fails like you did with the lacquer - I have been there and it's so frustrating. That hardware is dreeeeamy.
ReplyDeletethanks Jennifer! Yes, you know how first rating it can be for sure!
Deletethose tables are SO GOOD. ugh. jealous. What an incredible find!
ReplyDeleteThanks Mel:)!!
DeleteThose side tables look amazing! I saw the before and I was sooo hoping you would go black. Can't wait to see the final room reveal.
ReplyDeleteThank you Haley!!
DeleteThat. Hardware. Seriously, I've been smitten since I laid eyes on it on Instagram! Your tables came out SO good!! :)
ReplyDeletethank you Gabbi! I know you know the trials of painting furniture:) Thanks for commenting!
DeleteYour room is coming together soooo good! Those tables look amazing next to the green couch! Can't wait to see the after!
ReplyDelete