For this DIY project I needed a big round urn looking planter. You know the big stone saucer looking ones you see with the short squatty pedestal bottom? I mean I feel like I see them everywhere! Well, until I was looking for one! I looked everywhere and even went to Pottery Barn!! Those who know me know I am not a fan of Pottery Barn. I feel like I could nod off looking in there... same stuff reinvented every year in different shades of beige! I never did find one exactly like I was looking for but did find a sale planter at a local nursery that was black stone and was a good size for the project!
To add some interest I decided to use some Martha Stewart gold pearl paint and give the bottom that dipped look that you have seen recently. I thought it would also make the planter look more "indoor friendly" and less like it belonged out on the porch. Here is the painting in the progress. To give it that dipped look I applied the paint thicker on the edge and let it run down a little as to not have a solid straight line.
Once the painting was finished I filled the pot with indoor planting soil to the top. I purchased 2 bundles of the curling branches that you can find at any craft store (Hobby Lobby, in this case) and arranged them in the center of the pot. Then I planted 7 small moss plants, I found in 2 inch containers from a garden shop, in a circle around the branches. I then used some flat moss like the one pictured below from Hobby Lobby to fill and cover the dirt around the edge of the planter.
This is how it looks thus far with the steps above completed.
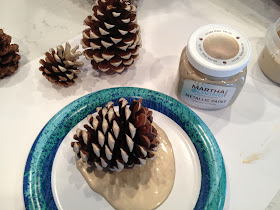
Then I decided to add some pine cones to give it some dimension and to break up the green a tad around the edge. Regular old pine cones won't do when you have left over gold paint from the pot!! I decided to try to roll the pine cones in the paint so that just the edges were dipped. They turned out pretty cool!
The final result.....
What do you think?! I think it could make its way through fall, Thanksgiving and Christmas, no?!
Hope you enjoyed! Cheers!
{Laura}
Don't forget to "like us" on Facebook


Yes, it totally can make it through all those seasons. Looks gorgeous too!
ReplyDeleteThanks Julie! I hope so! Its heavy and I don't want to move it! LOL
DeleteBeautiful job, Laura! I love all the natural elements you used.
ReplyDeletethanks Brandi:)
DeleteCuuuute! I like how your dip line is organic instead of perfectly straight! Looks great with the pine ones!
ReplyDeletethanks Sarah! It would have been hard to make it straight because of the curve of the bottom but I like the look both ways!
DeleteThis is so perfect! I am digging all the natural elements in decorating this year for Fall so this is right up my alley and the dipped bowl is the cherry on top! Love it!
ReplyDeleteha! yes, I love it too! Fall is way too short! I would love it to last as long as the winter!
DeleteI LOVE the way you dipped the pinecones! I am love with that runner... where did you get it?
ReplyDeleteThe runner is a paper roll. I did a post about this line because they do placemats and rolls of disposable runners etc. They are called Kitchen Papers. West Elm has them now!
DeleteLOOOVE. You're so right - this will work right through the holidays. Gorgeous!
ReplyDeletethanks Kelly:)
Deleteso fun!!! great result and I can envision some changes to make it perfect for the holidays! Its perfect.
ReplyDeleteThanks! it seems weird that the holidays will be here soon! Crazy fast summers!
DeleteLove the pine cone...so super cute! Great job!! :)
ReplyDeleteHi Gabbi,
DeleteThanks!
gorgeous! i love the runner!
ReplyDeleteThanks Cassie:)
Delete